|
http://sites.schaltungen.at/arduino-uno-r3/sd-card-shield/sd-card
http://www.seeedstudio.com/depot/sd-card-shield-for-arduino-v21-p-492.htmlWels, am 2015-01-28BITTE nützen Sie doch rechts OBEN das Suchfeld [ ] [ Diese Site durchsuchen]DIN A3 oder DIN A4 quer ausdrucken ********************************************************************************* DIN A4 ausdrucken
********************************************************* Untergeordnete Seiten (7):SDR-Shield SDR = Digital-Radio SD-Card Shield Data Logging Shield for Arduino
Data Logging Shield for Arduino:. Ein schönes Schild für die Erfüllung all Ihre Datenerfassung braucht. Daten können auf einer SD-Karte gespeichert werden, während die an Bord Echtzeituhr (DS1307) können Sie Ihren Stempel mit Lesungen. Ein im Lieferumfang enthaltenes Prototyping-Bereich macht es einfach, zusätzliche circutry hinzuzufügen. Es ist eine große Schild, um in jedem Projekt über die gut dokumentierte Software-Bibliotheken Schnittstelle.
Eigenschaften:
SD-Karte funktioniert entweder mit FAT16 oder FAT32 formatiert Karten (5V auf 3,3V Spannungswandler verhindert Schäden an der Karte) Lithium-Knopfzellen CR1220 hält die RTC Echzeituhrimmer am laufen, selbst wenn der Arduino ohne Stromversorgung ist. Mitgelieferte Bibliotheken machen die Inbetriebnahme zu einem Kinderspiel
http://oomlout.co.uk/blogs/news/7869865-new-product-data-logging-shield-for-arduino
********************************************************* SD-Card Shield 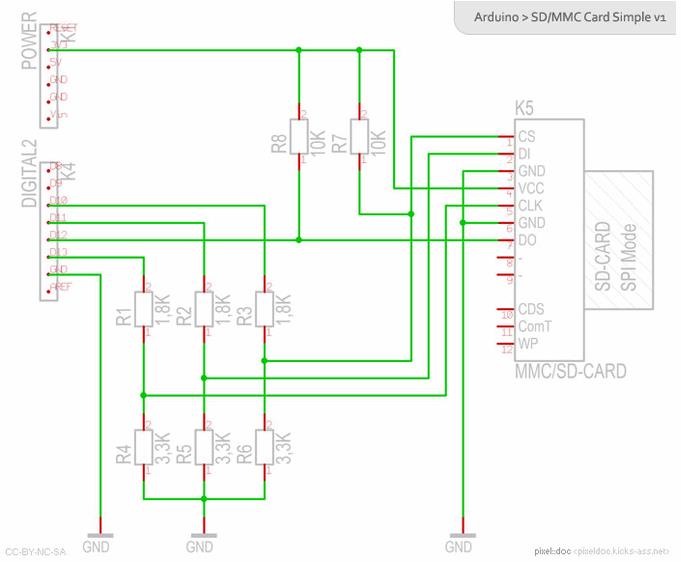
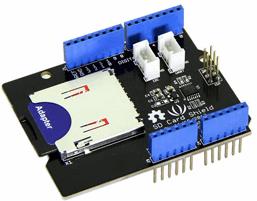
********************************************************* SD-Card Shield seeed studio SD card shieldSKU: INT106D1PSD Card Shield V4.0 (SLD01095P).
SD Card Shield V3.0http://www.seeedstudio.com/wiki/SD_Card_Shield_V3.0ITEAD STUDIO Arduino SD Card Shield And Filelogger Library
http://blog.iteadstudio.com/arduino-sd-card-shield-and-filelogger-library/
microSD Shield Quickstart Guide
https://www.sparkfun.com/tutorials/172
********************************************************* Arduino kompatibler microSD Kartenadapter  Verbindung des microSD Kartenadapters mit Arduino BoardsUm diesen microSD Adapter an ein Arduino Board anzuschließen, verbinden Sie
Dann können Sie die SDfatLib Bibliothek verwenden, welche kompatibel ist mit SD FAT und FAT32 Boards.
http://www.generationrobots.com/de/401122-arduino-kompatibler-microsd-kartenadapter.html
*********************************************************
SD TF Card Shield Expansion Board Shield module for Arduino DIY (Works with Official Arduino Boards) 
http://www.dx.com/p/catalex-sd-tf-card-shield-expansion-board-blue-black-works-with-official-arduino-boards-243997#.VBkvzhYQMec http://www.linkdelight.com/P0009695-SD-TF-Card-Shield-Expansion-Board-Shield-module-for-Arduino-DIY.html ********************************************************* Arduino DIY SD Card Logging Shield
http://www.instructables.com/id/Arduino-DIY-SD-Card-Logging-Shield/ ********************************************************* Stackable SD Card shield for Arduino v1.0 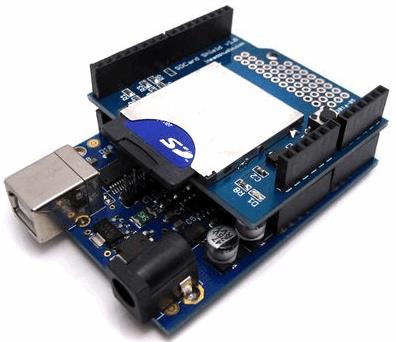
Arduino zu SD pinout:
Dokumente:
http://shop.boxtec.ch/stackable-card-shield-for-arduino-v10-p-40333.html *********************************************************
HW Kitchen
SD card shield is a Break out board for standard SD card. It will allow you to add mass storage and data logging to your project! 
http://www.hwkitchen.com/news/resume-of-new-products-from-sparkfun-and-seeed-studio/ Read more: http://www.hwkitchen.com/news/resume-of-new-products-from-sparkfun-and-seeed-studio/ ********************************************************* BootDrive for ArduinoAnnouncing the formal release of BootDrive for Arduino. If you’ve been reading the blog, you know that I’ve been working with Justin Shaw of Wyolum labs to enable their I2SD (Arduino clone with a micro-sd card) to bootload a program onto another Arduino. After battling several issues, mostly related to porting avrdude code to the Arduino (assumptions about infinite memory, etc!) it’s working well enough people can fool around with it. Right now the code looks for a single file (“program.hex”) and waits 5 sec and then blasts it into the target arduino. Details about setting up to try this yourself follow the video. Here’s a demo of it in action:
If you’d like to try this with a couple of Arduinos, you’ll also need an SD card (or micro-sd) interface such as the Adafruit Micro-SD breakout. This board is great because it has onboard 3.3v conversion so it’s safe to use with 5V (stock) Arduinos. Download the code from github: https://github.com/osbock/Baldwisdom/tree/master/BootDrive Hook up your Arduinos like this:

I The basic setup is:
Arduino Control:
SD Card Interface:
Optional debugging serial interface (This lets you see error messages and the like) Here are the defines you can change to swap the pins around:
#define BOOT_BAUD 115200 // This is the Arduino UNO’s bootloader baud rate. Other boards are different! Also if you want to put your SD card on a different line (or are using a shield that uses a different chip select) change this: const int chipSelect = 10; Action!
Right now, 5 seconds after initialization, the program blasts a file called “program.hex”. You can add your own user interface to select amongst multiple programs.
Action! void programArduino(char *filename) with the filename, e.g.” programArduino("program2.hex");
You can build new hex files by grabbing them from the Arduino build directory. Make sure you have the IDE set up for your target board and press the “compile/verify” button. From http://arduino.cc/en/Hacking/BuildProcess:
Note on Windows7, the base directory is \users\<USER> \appdata\local\Temp\build<some bunch of numbers>.tmp\<sketchname>.cpp.hex Note that if you want to load an Arduino other than UNO, you’ll need to change the baud rate. You can find that in “hardware/arduino/boards.txt” in the arduino directory. This won’t work on MEGA based Arduinos as they use the stk500v2 protocol (thanks westfw!)
Sie können neue Hex-Dateien, indem er sie aus dem Arduino Build-Verzeichnis zu bauen. Stellen Sie sicher, dass das IDE-up für Ihre Zielplatine ein und drücken Sie die Schaltfläche "Übersetzen / überprüfen".
Von http://arduino.cc/en/Hacking/BuildProcess: Der HEX-Datei ist die letzte Ausgabe der Zusammenstellung, die dann in den Vorstand hochgeladen. Während ein "Überprüfen" die Hex-Datei wird in / tmp (auf Mac und Linux) oder \ Dokumente und Einstellungen \ <Benutzername> \ Lokale Einstellungen \ Temp (unter Windows) geschrieben. Während des Uploads wird es zum Applet-Unterverzeichnis der Skizzenbuch (die Sie mit dem Einzelteil "Sketch-Ordner anzeigen" in der Sketch-Menü zu öffnen) geschrieben Hinweis auf Windows7, ist das Basisverzeichnis \ users \ <Benutzer> \ AppData \ Local \ Temp \ build <einige Reihe von Zahlen> TMP \ <sketchname> .cpp.hex Beachten Sie, dass, wenn Sie eine andere als UNO Arduino laden möchten, müssen Sie die Baudrate verändern. Sie können, dass in "Hardware / Arduino / boards.txt" in der Arduino-Verzeichnis zu finden. Dies wird nicht auf der Basis arbeiten MEGA Arduinos, wie sie die stk500v2 Protokoll verwenden (dank westfw!) ********************************************************* Connect Your Old SD Card To An ArduinoAfter a few weeks playing with my arduino, It started to become clear that I would need a way to start storing some data, I had already ordered a network shield which has a built in micro sd slot, but that wouldn’t be with me, for at least a week… so I had to find another way. You can find a lot of SD Cards at low prices, no matter which one you want to use, their functionalities are the same, they only differ for storage capacity and access time. The interface is the same so you can change the card without changing your project. In this tutorial, I’m going to use an old Micro SD Adapter, along with a 2GB micro SD card. This image shows the basics for connecting the SD Card directly to the arduino, with this method you can solder pins directly to the SD card adapter and slot in your micro sd card with ease.
Nach ein paar Wochen mit meinen Arduino, Es begann klar zu werden, dass ich einen Weg brauchen, um einige Daten zu speichern, hatte ich schon ein Netz, das ein Schild in der Mikro-SD-Slot eingebaut hat angeordnet, aber das würde nicht mit mir zusammen sein , für mindestens eine Woche ... so musste ich einen anderen Weg finden.

SD Cards work with 3.3V, they have 9 pins as shown: 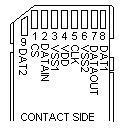
Things you’ll needTo build a board to interface Arduino with a SDCard, you’ll need the following materials:
We are going to use the resistors to build the resistive dividers, so we can use the 3.3V starting from the 5V I/O of Arduino. Building the BoardYou have to wire the circuit, shown in the following picture. Here is simple scheme of the circuit over a stripboard.
Dinge, die Sie brauchen werden
1x 6-pol. Stiftleiste
3Stk. 3,3k Ohm Widerstände
Bau des Shieldes 
Test the board works.Connect the pins on the board with the corresponding pins on the Arduino board, plug the SD card into the adapter and power on your Arduino boar. Now on the Arduino IDE compile and upload the following code. (it is available in File->Examples->SD->ReadWrite), and sit back & wait for the results. /*
SD card read/write
This example shows how to read and write data to and from an SD card file
The circuit:
* SD card attached to SPI bus as follows:
** MOSI - pin 11
** MISO - pin 12
** CLK - pin 13
** CS - pin 4 // 4 bei Ethernet 10 bei SD-Card
created Nov 2010
by David A. Mellis
updated 2 Dec 2010
by Tom Igoe
This example code is in the public domain.
*/
#include
File myFile;
void setup()
{
Serial.begin(9600);
Serial.print("Initializing SD card...");
// On the Ethernet Shield, CS is pin 4. It's set as an output by default.
// Note that even if it's not used as the CS pin, the hardware SS pin
// (10 on most Arduino boards, 53 on the Mega) must be left as an output
// or the SD library functions will not work.
pinMode(10, OUTPUT);
if (!SD.begin(4)) {
Serial.println("initialization failed!");
return;
}
Serial.println("initialization done.");
// open the file. note that only one file can be open at a time,
// so you have to close this one before opening another.
myFile = SD.open("test.txt", FILE_WRITE);
// if the file opened okay, write to it:
if (myFile) {
Serial.print("Writing to test.txt...");
myFile.println("testing 1, 2, 3.");
// close the file:
myFile.close();
Serial.println("done.");
} else {
// if the file didn't open, print an error:
Serial.println("error opening test.txt");
}
// re-open the file for reading:
myFile = SD.open("test.txt");
if (myFile) {
Serial.println("test.txt:");
// read from the file until there's nothing else in it:
while (myFile.available()) {
Serial.write(myFile.read());
}
// close the file:
myFile.close();
} else {
// if the file didn't open, print an error:
Serial.println("error opening test.txt");
}
}
void loop()
{
// nothing happens after setup
}
upload the code, to the arduino and open your serial monitor window (ctrl + m) http://www.martin-gardner.co.uk/how-to-connect-your-old-sd-card-to-an-arduino/DIN A4 ausdrucken ********************************************************* Impressum: Fritz Prenninger, Haidestr. 11A, A-4600 Wels, Ober-Österreich, mailto:[email protected] ENDE |
SD-Card-Shield >